> ## Documentation Index
> Fetch the complete documentation index at: https://docs.tamarind.bio/llms.txt
> Use this file to discover all available pages before exploring further.
# Single Sign-On (SSO)
> Connect Okta, Microsoft Entra ID, Google Workspace, or any SAML 2.0 identity provider
Connect your company's identity provider (IdP) to Tamarind Bio so your team signs in with their work account. Tamarind uses SAML and supports **Okta**, **Microsoft Entra ID**, **Google Workspace**, and any other SAML 2.0 provider. The screenshots below use Microsoft Entra ID as the example.
## Before you begin
* You need **Admin** access to your Tamarind organization.
* You need admin access to your identity provider (for example, the Okta Admin Console, Microsoft Entra admin center, or Google Admin console).
* Every user who should get access needs an email address on your company domain set in the IdP.
Setting up SSO doesn't change how anyone signs in until Tamarind activates it. You can configure and test safely.
***
## 1. Open Organization settings
Sign in at [app.tamarind.bio/app](https://app.tamarind.bio/app). In the left sidebar, click **Organization** **(1)**.
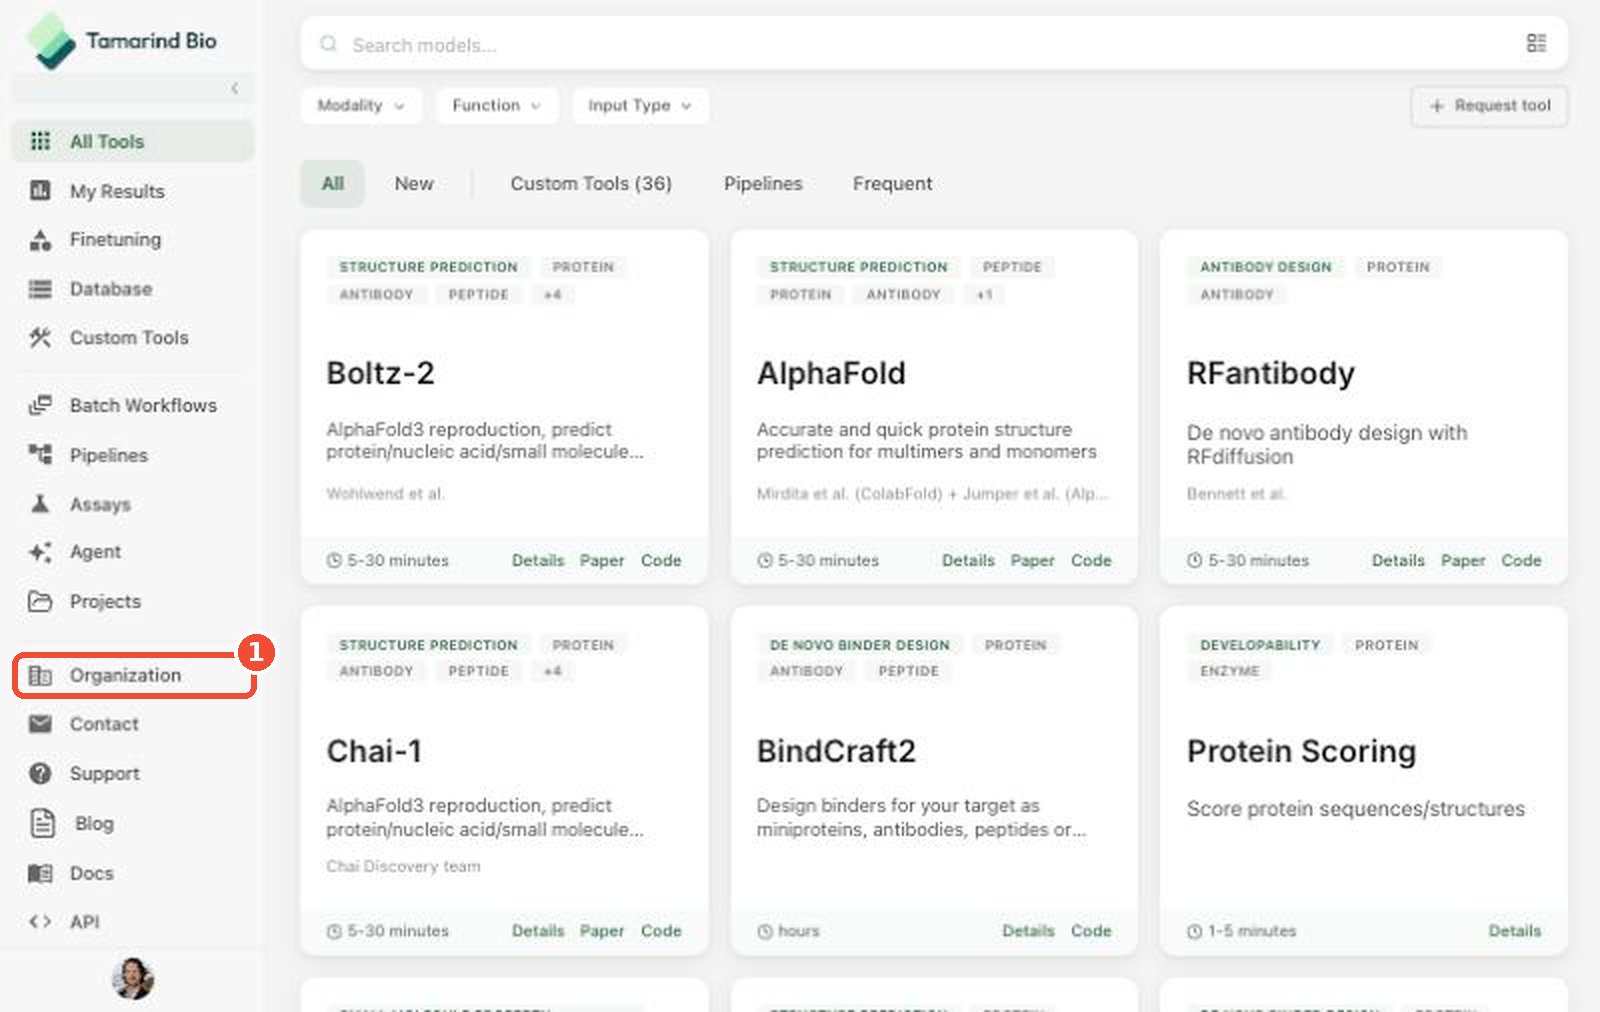 If the sidebar only shows icons, click the **›** arrow at the top of the sidebar to expand it.
## 2. Open Single Sign-On
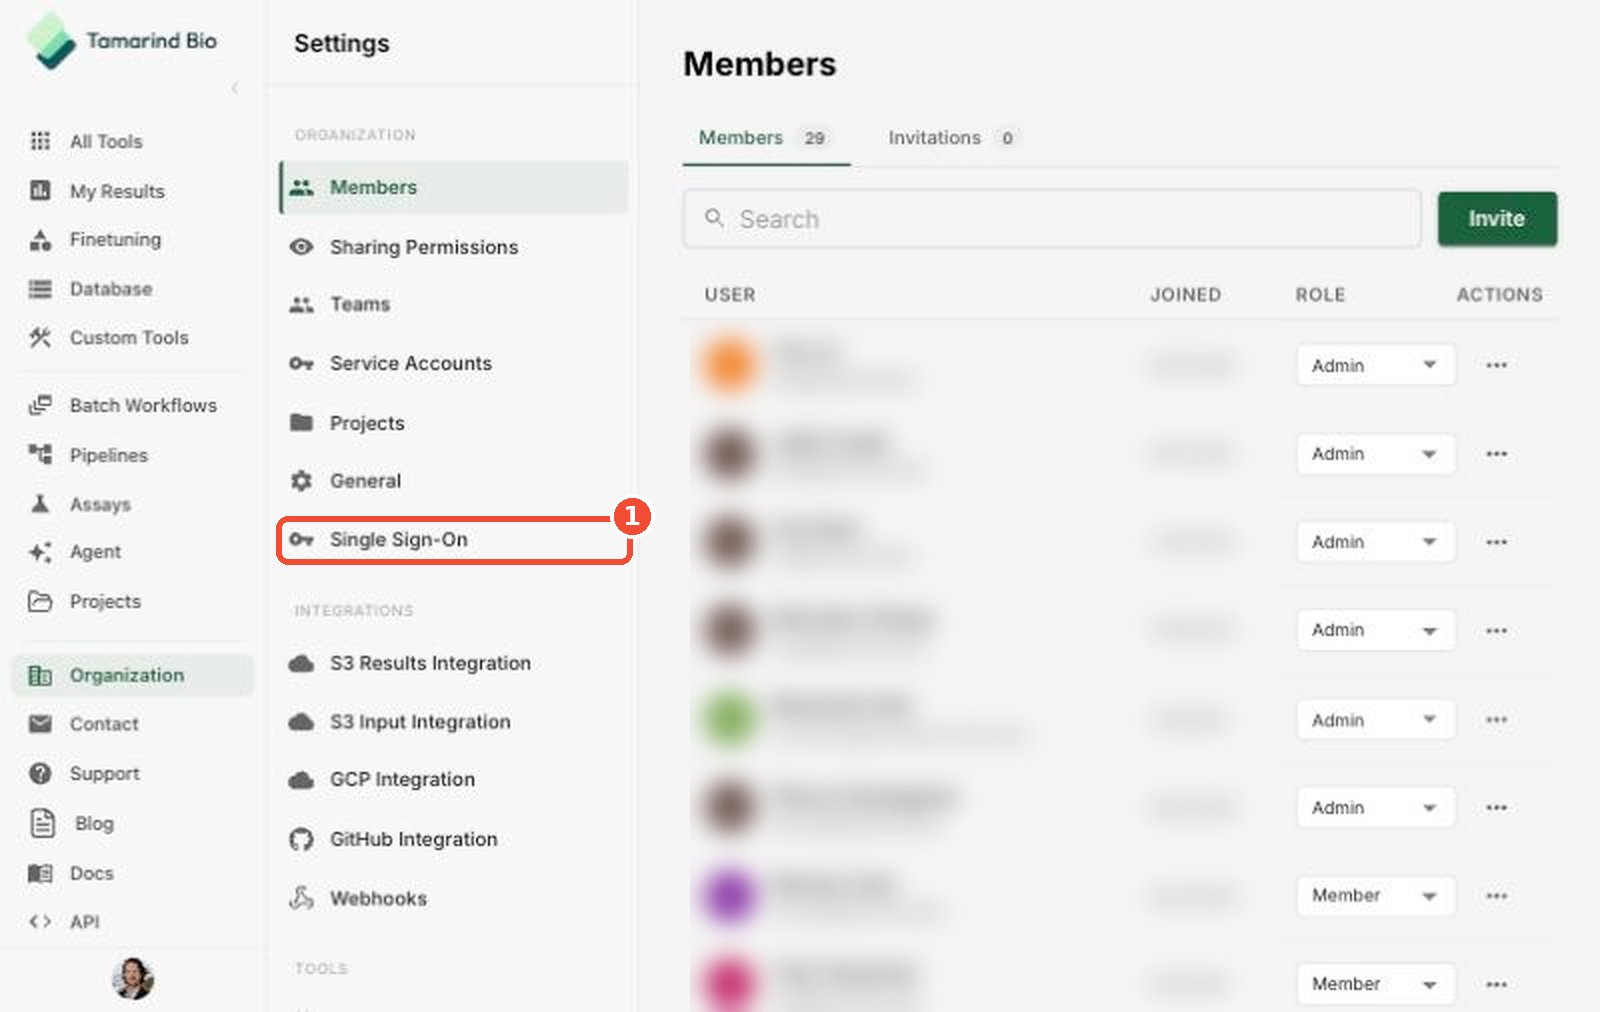
Under **Organization** in the settings menu, click **Single Sign-On** **(1)**.
If the sidebar only shows icons, click the **›** arrow at the top of the sidebar to expand it.
## 2. Open Single Sign-On
Under **Organization** in the settings menu, click **Single Sign-On** **(1)**.
 ## 3. Choose your identity provider and email domain
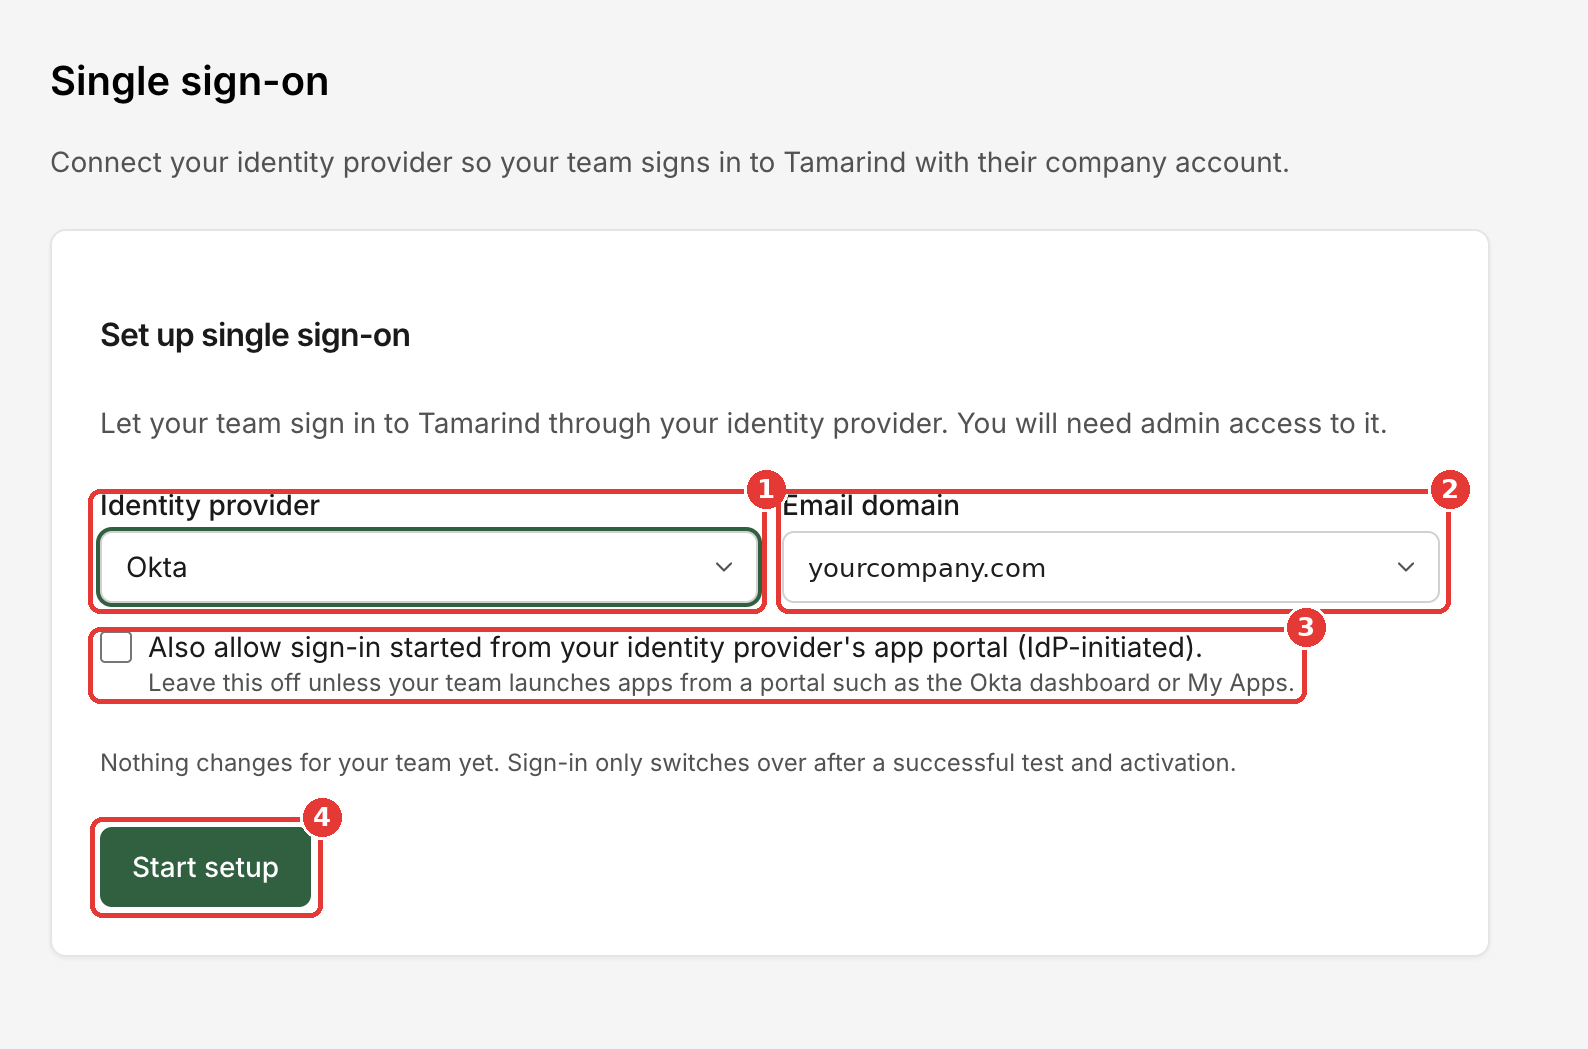
Under **Set up single sign-on**:
1. **Identity provider** — select the provider your company uses:
| Option | Choose this if… |
| - | - |
| **Okta** | Your team signs in through Okta. |
| **Microsoft Entra ID** | Your team uses Microsoft 365 / Azure AD accounts. |
| **Google Workspace** | Your team uses Google Workspace accounts. |
| **Other SAML Provider** | You use any other SAML 2.0 IdP (for example, OneLogin, JumpCloud, PingFederate, or ADFS). |
The setup steps on the next screen are written for the provider you pick.
2. **Email domain** — select the company email domain that should sign in through SSO. Everyone with an email on this domain will use SSO once it's activated.
3. **IdP-initiated sign-in** *(optional)* — check this only if your team launches apps from a portal such as the Okta dashboard or Microsoft My Apps. Leave it off otherwise. You can change this later.
4. Click **Start setup**.
## 3. Choose your identity provider and email domain
Under **Set up single sign-on**:
1. **Identity provider** — select the provider your company uses:
| Option | Choose this if… |
| - | - |
| **Okta** | Your team signs in through Okta. |
| **Microsoft Entra ID** | Your team uses Microsoft 365 / Azure AD accounts. |
| **Google Workspace** | Your team uses Google Workspace accounts. |
| **Other SAML Provider** | You use any other SAML 2.0 IdP (for example, OneLogin, JumpCloud, PingFederate, or ADFS). |
The setup steps on the next screen are written for the provider you pick.
2. **Email domain** — select the company email domain that should sign in through SSO. Everyone with an email on this domain will use SSO once it's activated.
3. **IdP-initiated sign-in** *(optional)* — check this only if your team launches apps from a portal such as the Okta dashboard or Microsoft My Apps. Leave it off otherwise. You can change this later.
4. Click **Start setup**.
 If you see *"Your organization already has a single sign-on connection that Tamarind set up for you,"* your SSO is managed by Tamarind. [Contact us](#need-help) to make changes.
## 4. Review your SSO connection
After you click **Start setup**, the page shows your connection:
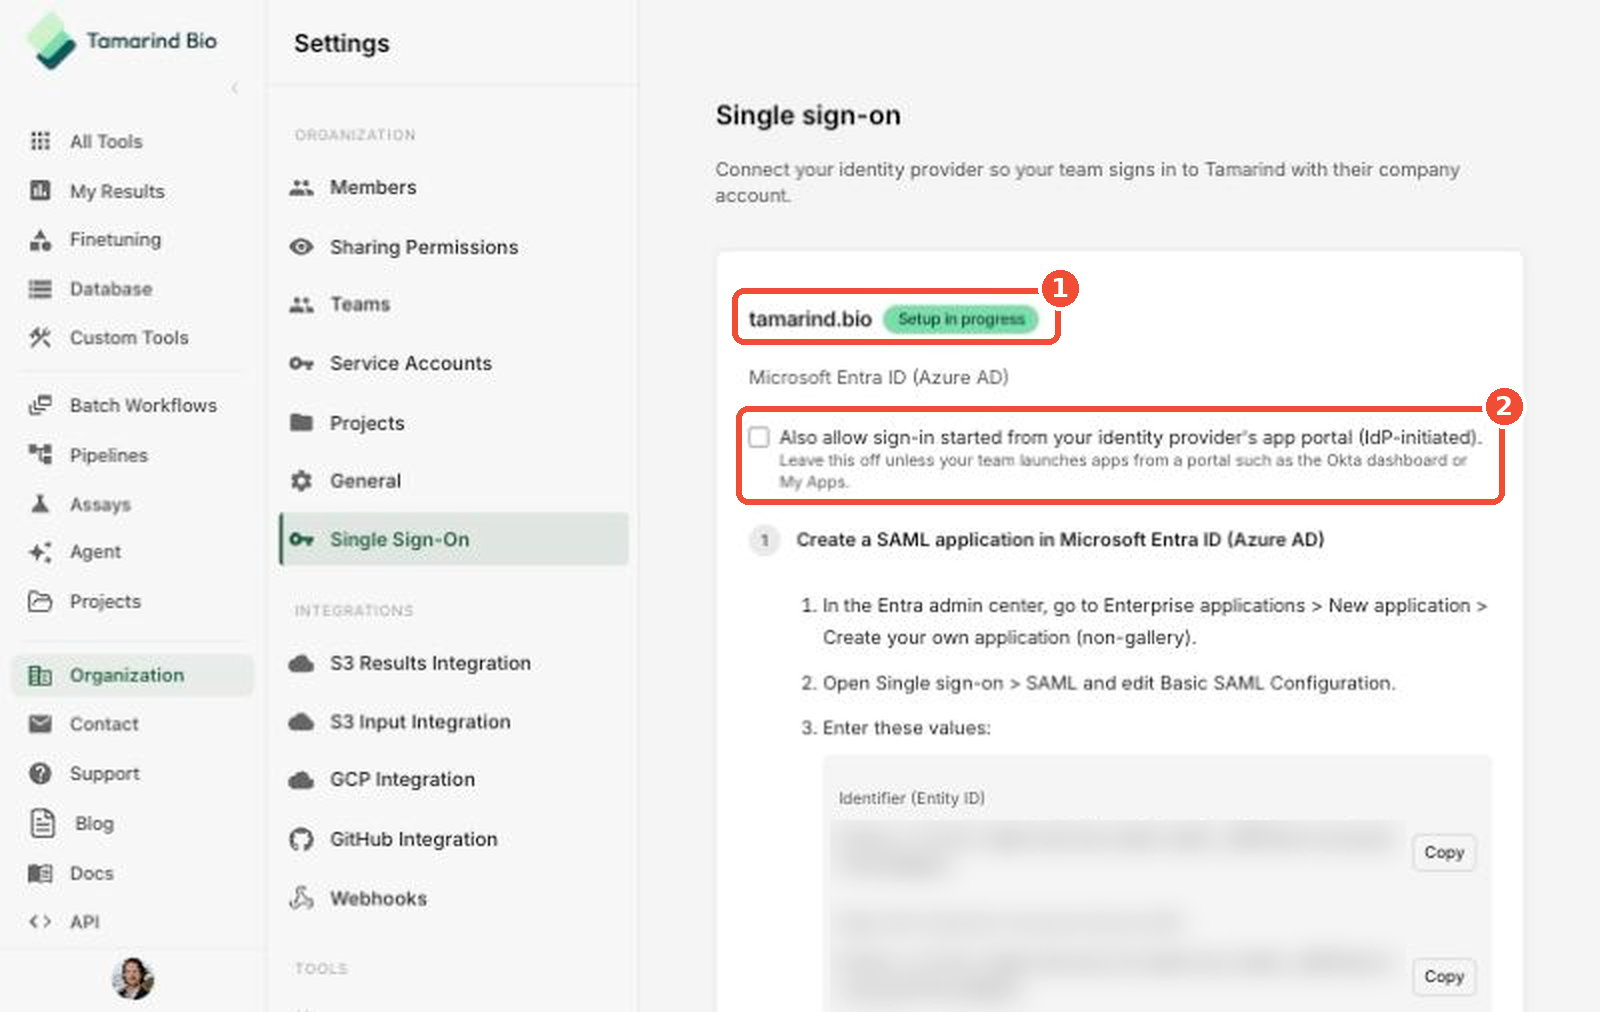
1. **Your domain and status** — for example, `yourcompany.com` with a **Setup in progress** badge.
2. **IdP-initiated sign-in** — the same option from Step 3, which you can still change here.
Below that are four numbered steps: create the app in your IdP, give Tamarind your metadata, test, and turn it on.
If you see *"Your organization already has a single sign-on connection that Tamarind set up for you,"* your SSO is managed by Tamarind. [Contact us](#need-help) to make changes.
## 4. Review your SSO connection
After you click **Start setup**, the page shows your connection:
1. **Your domain and status** — for example, `yourcompany.com` with a **Setup in progress** badge.
2. **IdP-initiated sign-in** — the same option from Step 3, which you can still change here.
Below that are four numbered steps: create the app in your IdP, give Tamarind your metadata, test, and turn it on.
 ## 5. Create a SAML application in your identity provider
Tamarind shows the values your IdP needs, such as the **Entity ID** and **Assertion Consumer Service (ACS) URL**, with **Copy** buttons **(1)**.
## 5. Create a SAML application in your identity provider
Tamarind shows the values your IdP needs, such as the **Entity ID** and **Assertion Consumer Service (ACS) URL**, with **Copy** buttons **(1)**.
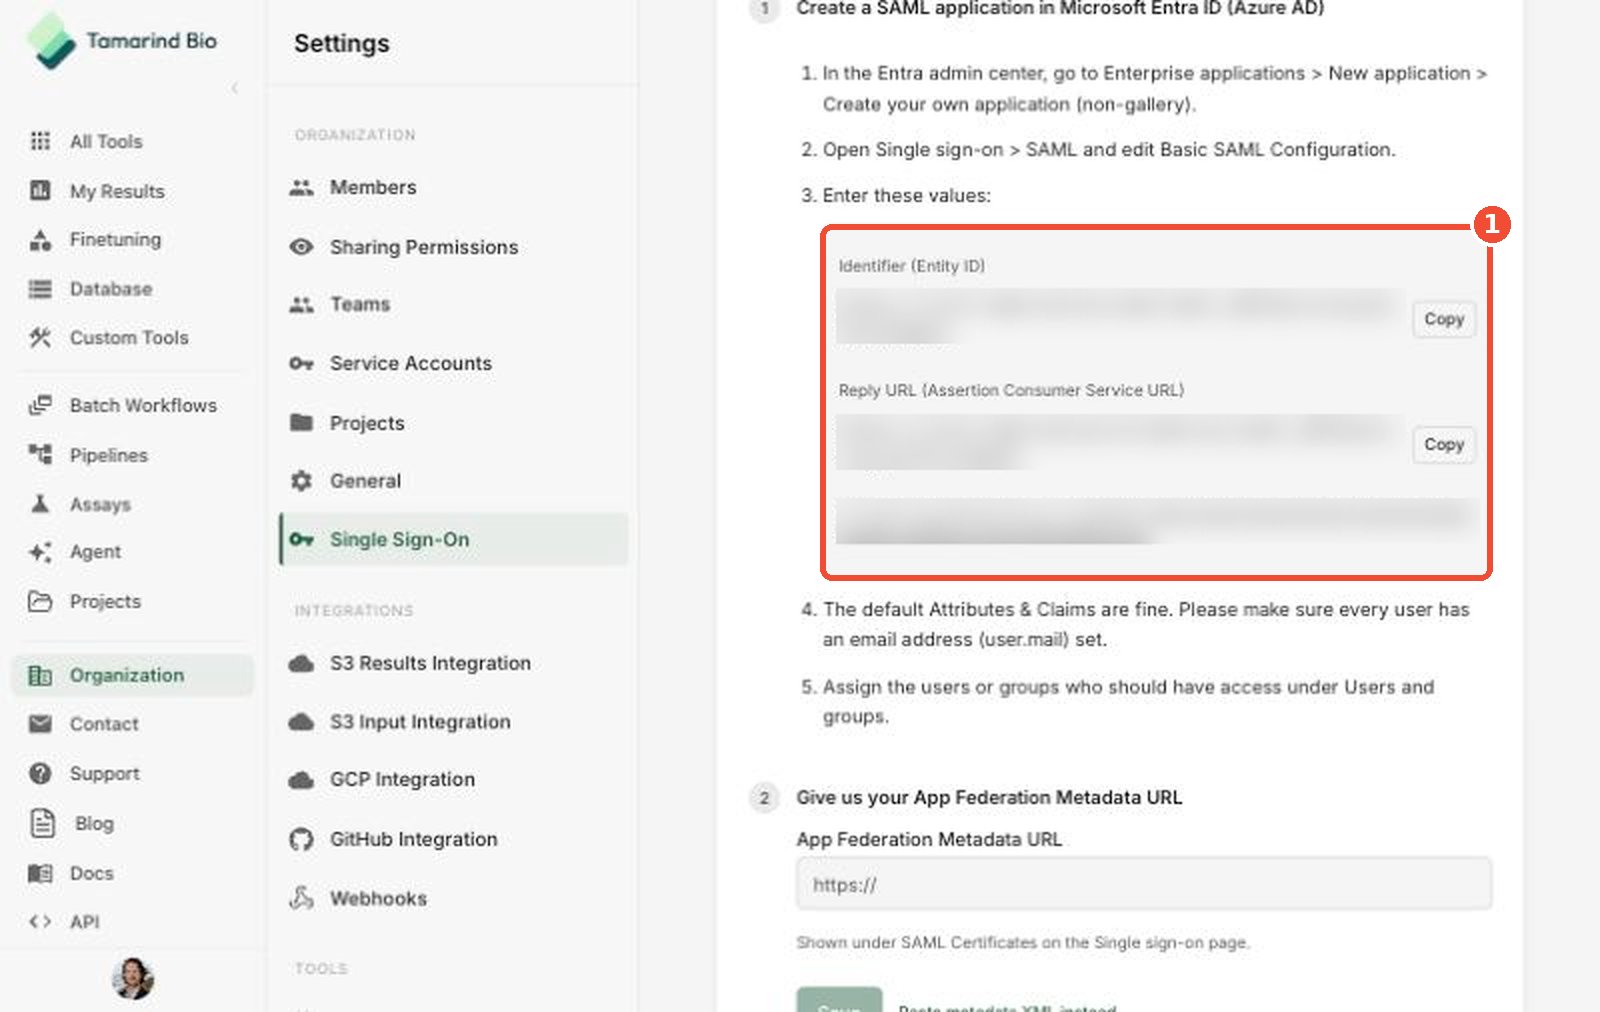 These values are unique to your organization. Always copy them from your own Tamarind SSO page.
### Microsoft Entra ID
1. In the Entra admin center, go to **Enterprise applications** → **New application** → **Create your own application** (non-gallery).
2. Open **Single sign-on** → **SAML** and edit **Basic SAML Configuration**.
3. Paste the values from Tamarind:
| Tamarind field | Entra field |
| - | - |
| Identifier (Entity ID) | Identifier (Entity ID) |
| Reply URL (Assertion Consumer Service URL) | Reply URL (Assertion Consumer Service URL) |
Or, import everything at once using the metadata URL shown below the two values.
4. Keep the default **Attributes & Claims**. Make sure every user has an email address (`user.mail`) set.
5. Under **Users and groups**, assign the users or groups who should have access to Tamarind.
### Okta
1. In the Okta Admin Console, go to **Applications** → **Applications** → **Create App Integration**, then choose **SAML 2.0**.
2. Name the app (for example, *Tamarind Bio*) and continue to **Configure SAML**.
3. Paste the Tamarind **ACS URL** into **Single sign-on URL** and the **Entity ID** into **Audience URI (SP Entity ID)**.
4. Set **Name ID format** to **EmailAddress** and **Application username** to **Email**.
5. Finish the wizard, then assign users or groups on the app's **Assignments** tab.
### Google Workspace
1. In the Google Admin console, go to **Apps** → **Web and mobile apps** → **Add app** → **Add custom SAML app**.
2. Name the app (for example, *Tamarind Bio*) and continue. On the **Google Identity Provider details** screen, click **Download metadata** — you'll give this file to Tamarind in Step 6.
3. Paste the Tamarind **ACS URL** and **Entity ID** into the matching fields.
4. Set **Name ID format** to **EMAIL** and **Name ID** to **Basic Information > Primary email**.
5. Finish, then turn the app **ON** for the organizational units or groups who should have access.
### Other SAML provider
Create a new SAML 2.0 application in your IdP and configure:
* **ACS URL / Reply URL / Single sign-on URL:** the Tamarind ACS URL
* **Entity ID / Audience:** the Tamarind Entity ID
* **Name ID:** the user's email address
Then assign the users or groups who should have access.
## 6. Connect, test, and activate
### Give Tamarind your IdP metadata
Paste your IdP's metadata URL into the metadata URL field **(1)** and click **Save**.
| Provider | Where to find the metadata |
| - | - |
| Microsoft Entra ID | **App Federation Metadata URL**, under **SAML Certificates** on the app's Single sign-on page |
| Okta | **Metadata URL** on the app's **Sign On** tab |
| Google Workspace | The metadata file you downloaded in Step 5 (use **Paste metadata XML instead**) |
| Other SAML provider | Your IdP's metadata URL or XML file |
These values are unique to your organization. Always copy them from your own Tamarind SSO page.
### Microsoft Entra ID
1. In the Entra admin center, go to **Enterprise applications** → **New application** → **Create your own application** (non-gallery).
2. Open **Single sign-on** → **SAML** and edit **Basic SAML Configuration**.
3. Paste the values from Tamarind:
| Tamarind field | Entra field |
| - | - |
| Identifier (Entity ID) | Identifier (Entity ID) |
| Reply URL (Assertion Consumer Service URL) | Reply URL (Assertion Consumer Service URL) |
Or, import everything at once using the metadata URL shown below the two values.
4. Keep the default **Attributes & Claims**. Make sure every user has an email address (`user.mail`) set.
5. Under **Users and groups**, assign the users or groups who should have access to Tamarind.
### Okta
1. In the Okta Admin Console, go to **Applications** → **Applications** → **Create App Integration**, then choose **SAML 2.0**.
2. Name the app (for example, *Tamarind Bio*) and continue to **Configure SAML**.
3. Paste the Tamarind **ACS URL** into **Single sign-on URL** and the **Entity ID** into **Audience URI (SP Entity ID)**.
4. Set **Name ID format** to **EmailAddress** and **Application username** to **Email**.
5. Finish the wizard, then assign users or groups on the app's **Assignments** tab.
### Google Workspace
1. In the Google Admin console, go to **Apps** → **Web and mobile apps** → **Add app** → **Add custom SAML app**.
2. Name the app (for example, *Tamarind Bio*) and continue. On the **Google Identity Provider details** screen, click **Download metadata** — you'll give this file to Tamarind in Step 6.
3. Paste the Tamarind **ACS URL** and **Entity ID** into the matching fields.
4. Set **Name ID format** to **EMAIL** and **Name ID** to **Basic Information > Primary email**.
5. Finish, then turn the app **ON** for the organizational units or groups who should have access.
### Other SAML provider
Create a new SAML 2.0 application in your IdP and configure:
* **ACS URL / Reply URL / Single sign-on URL:** the Tamarind ACS URL
* **Entity ID / Audience:** the Tamarind Entity ID
* **Name ID:** the user's email address
Then assign the users or groups who should have access.
## 6. Connect, test, and activate
### Give Tamarind your IdP metadata
Paste your IdP's metadata URL into the metadata URL field **(1)** and click **Save**.
| Provider | Where to find the metadata |
| - | - |
| Microsoft Entra ID | **App Federation Metadata URL**, under **SAML Certificates** on the app's Single sign-on page |
| Okta | **Metadata URL** on the app's **Sign On** tab |
| Google Workspace | The metadata file you downloaded in Step 5 (use **Paste metadata XML instead**) |
| Other SAML provider | Your IdP's metadata URL or XML file |
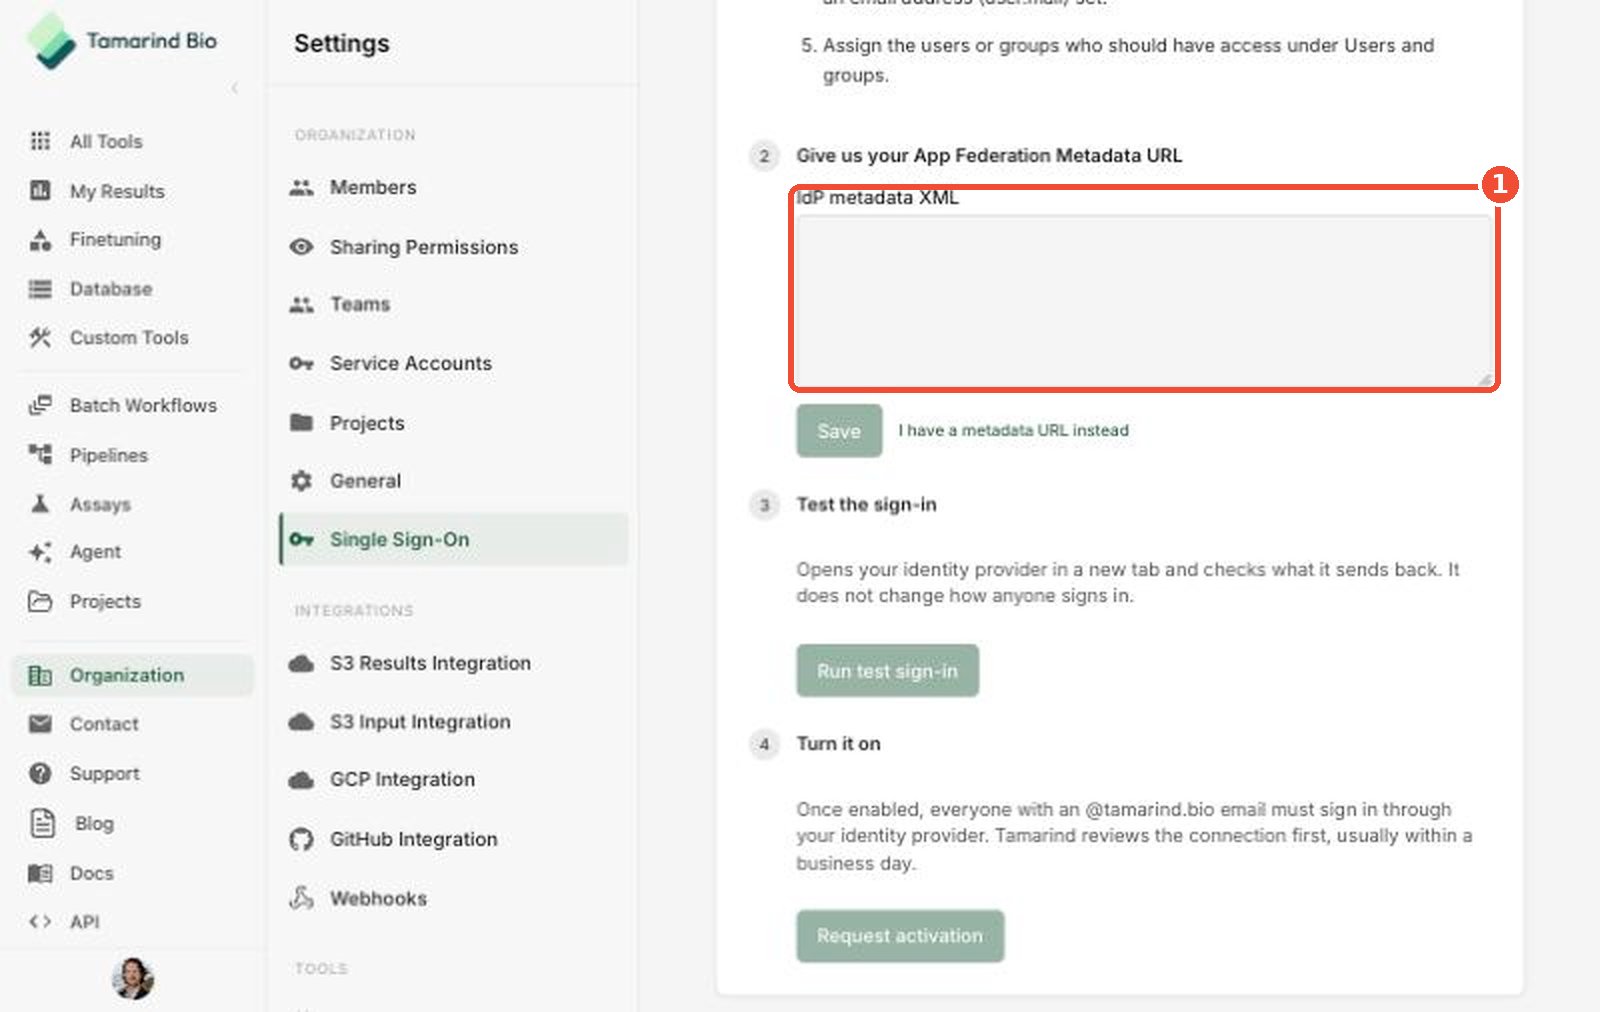
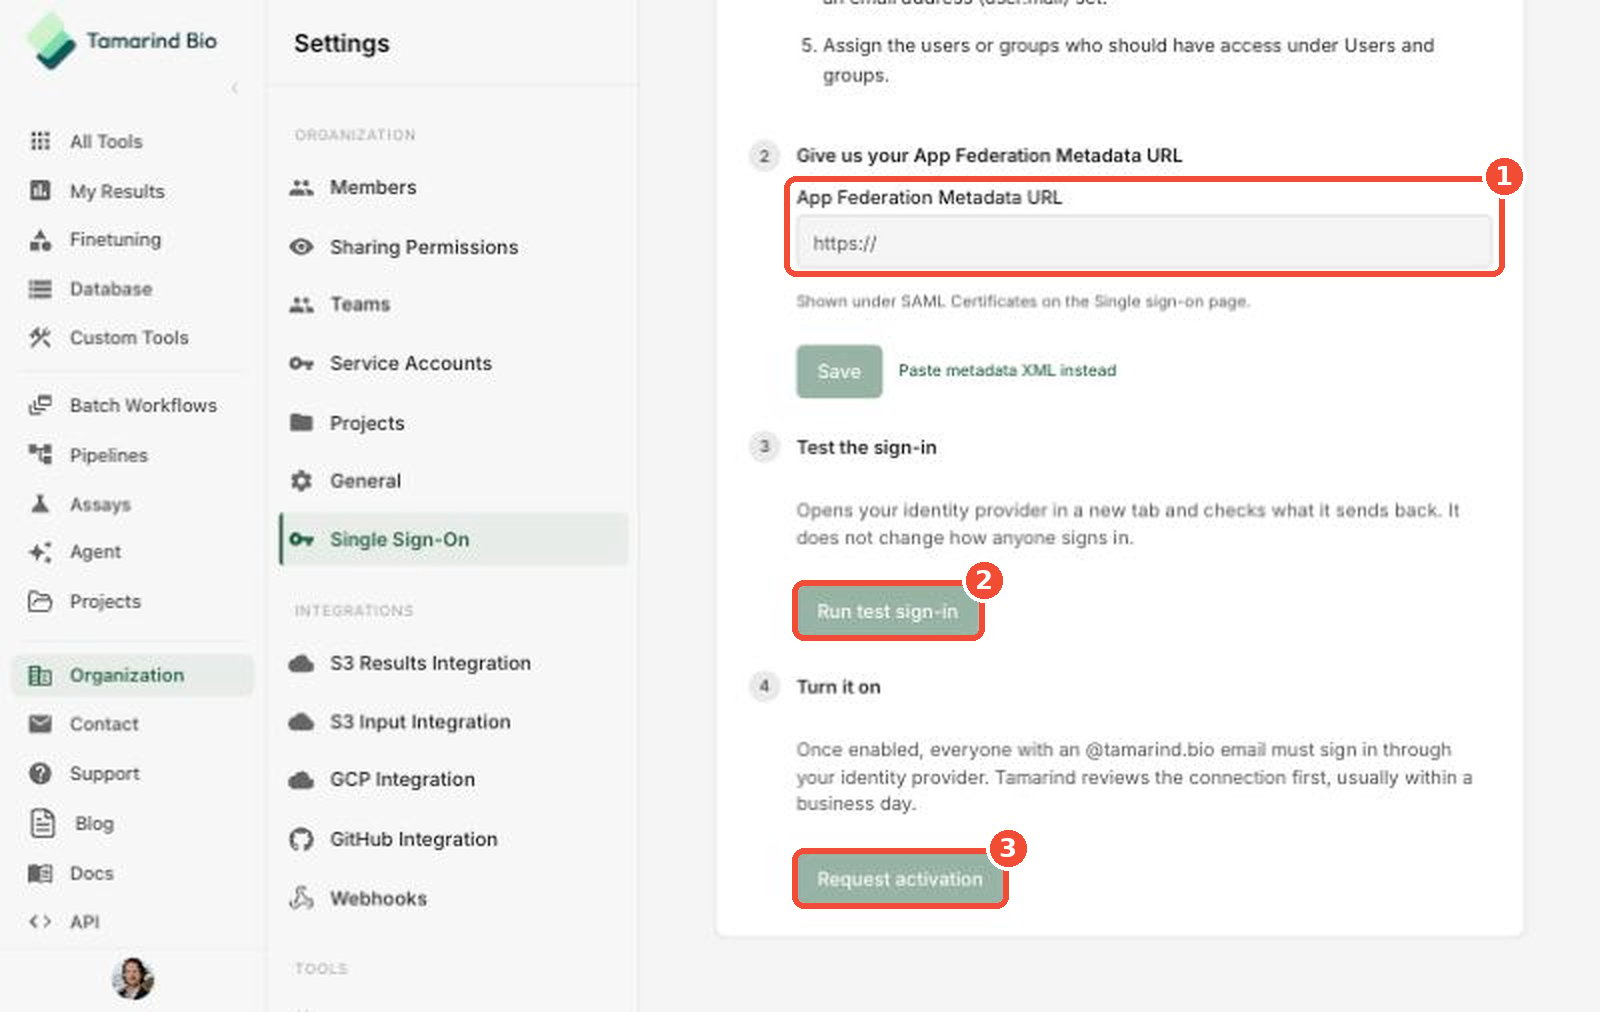 **Don't have a metadata URL?** Click **Paste metadata XML instead**, paste the full contents of your IdP's metadata XML file **(1)**, and click **Save**. To switch back, click **I have a metadata URL instead**.
 ### Test the sign-in
Click **Run test sign-in** **(2)**. Tamarind opens your identity provider in a new tab and checks what it sends back. The test doesn't change how anyone signs in.
### Request activation
When the test passes, click **Request activation** **(3)**. Tamarind reviews the connection, usually within one business day.
## 7. After activation
Once SSO is turned on, **everyone with an email on your domain must sign in through your identity provider**. Users choose **Continue with SSO** on the Tamarind sign-in page.
***
## Troubleshooting
| Problem | What to check |
| - | - |
| Test sign-in fails | Confirm the Entity ID and ACS URL in your IdP exactly match the values on your Tamarind SSO page. |
| A user can't sign in | Confirm the user is assigned to the app in your IdP and has an email address set. |
| Users land on an IdP error page | Check that the metadata URL or XML saved in Tamarind is from the same application you configured. |
| The SSO page says Tamarind set up your connection | Your connection is managed by Tamarind. Contact us to change it. |
## Need help?
Click **Support** in the app sidebar.
This documentation is built and hosted on [Mintlify](https://mintlify.com), a developer documentation platform.
### Test the sign-in
Click **Run test sign-in** **(2)**. Tamarind opens your identity provider in a new tab and checks what it sends back. The test doesn't change how anyone signs in.
### Request activation
When the test passes, click **Request activation** **(3)**. Tamarind reviews the connection, usually within one business day.
## 7. After activation
Once SSO is turned on, **everyone with an email on your domain must sign in through your identity provider**. Users choose **Continue with SSO** on the Tamarind sign-in page.
***
## Troubleshooting
| Problem | What to check |
| - | - |
| Test sign-in fails | Confirm the Entity ID and ACS URL in your IdP exactly match the values on your Tamarind SSO page. |
| A user can't sign in | Confirm the user is assigned to the app in your IdP and has an email address set. |
| Users land on an IdP error page | Check that the metadata URL or XML saved in Tamarind is from the same application you configured. |
| The SSO page says Tamarind set up your connection | Your connection is managed by Tamarind. Contact us to change it. |
## Need help?
Click **Support** in the app sidebar.
This documentation is built and hosted on [Mintlify](https://mintlify.com), a developer documentation platform.